Saturday, 29 May 2010

Picture of the week: A Fairthorpe Electron Minor with a difference


The subject this week needed two pictures to do it justice. They were taken in 1986 at the Fairthorpe Sports Car Club AGM, which was held that year at the Stonleigh kit car show.


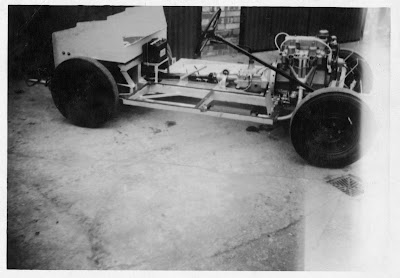
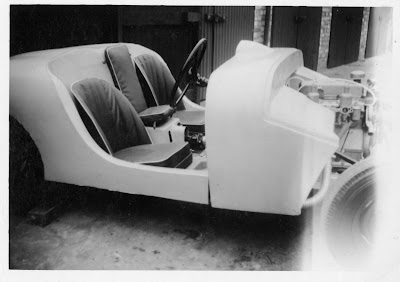
The car is a 1961 MK2 owned by Brian Jackson. It was bought by a friend of his in 1968 and was originally fitted with a 948cc Herald engine. Over the next few years Brian and his friend gradually modified the car, first fitting it with a 1300 Spitfire engine, then a Triumph Vitesse 6 cylinder and finally the current Dolomite Sprint engine.


The rear suspension, originally the Fairthorpe designed independent set-up, has been replaced with a Ford Escort axle with Dolomite suspension, while the front end has had Spitfire suspension towers fitted. The radiator has been moved back and fitted into the tail section bodywork behind where the passenger seat would have been. Also the car has been fitted with Escort works-style bubble arches, giving the car a much more muscular appearence.


The car was sprinted, hillclimbed and autotested through the 70s and 80s, however from 1972 it was taken off the road and trailered to these events until around the mid 80s. After languishing at the bottom of his friend's garden for many years Brian rescued it and is currently in the latter stages of a restoration. He's hopeful it could be on the road again later this year.


Looking foward to seeing it again Brian...........

Saturday, 22 May 2010

Picture of the week - Atom Convertible and early Electron chassis


According to my records, this picture was taken around 1957 in Chalfont St Peter outside the Fairthorpe works and features an Atom Convertible in the background with an early Electron chassis in the foreground.

The Atom Convertible is either a MkII or MkIII model and will have had either a 348cc or 645cc BSA motorbike engine. The gearbox was an Albion and the car was chain-driven.

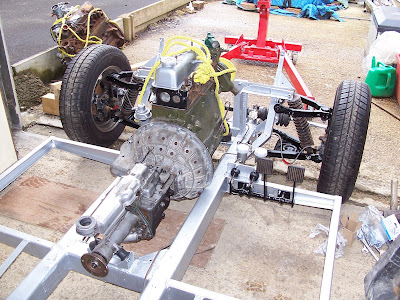
The Electron chassis has been fitted with a Coventry Climax 1098cc engine and Triumph TR suspension and steering. Normally the petrol tank sits inside the boot; this one however has the fuel tank under the chassis which may indicate it is a very early car.

Sunday, 16 May 2010

Fairthorpe gathering 15th August 2010

Attention all Fairthorpe enthusiasts.

On 15th August 2010 we'll be holding a Fairthorpe gathering at Stow Maries WWI Aerodrome in Essex. The event is open to all Fairthorpe fans, not just owners, so if you have one, had one or want one this event is for you! We already have several racing Fairthorpes coming, as well as E.Ms, Electrons and a Pathfinder.

Owner Russell Savory is doing some amazing restoration work of the airfield and has offered to include a guided tour of it as well as a tour of the R S Performance workshops, which house many V6- and V8-engined high performance sportscars.

If you fancy a great day out among like-minded Fairthorpe fans, put this in your diary and then email me on kartman.nascar24@btinternet.com to let me know you're coming. There'll be refreshments available to keep you going and prizes for the best-looking Fairthorpe and the furthest traveled Fairthorpe.

Saturday, 15 May 2010

Fairthorpe picture of the week


From now on I'll be publishing a Fairthorpe picture of the week taken from my extensive file of images that I've been collecting. They won't all be of Electron Minors though - there will be Electrons, Zetas, Rockettes, Atoms, Atomota, Electrinas, Trippers, TXs and Pathfinders.

So what is the image this week?

It's 789 ERO taken in August 1959 in the South of France during my parent's honeymoon. Despite being uncommon at that time, Frank and Audrey were amazed to see another Fairthorpe Electron Minor coming the other way on an isolated coast road! Note the lack of indictors on the other car - these were an optional extra in an Fairthorpe Electron Minor kit back then, as were a second windscreen wiper and fibreglass floor pan on the passenger side instead of the very basic wood pan provided!

The registration of the other car is UCG 664 - I wonder what happened to it and where it is now? Any ideas?

If you have any photos of Fairthorpes, feel free to send them across to me in an email and I'll select the best ones for publishing.

Tuesday, 11 May 2010

Fairthorpe for sale on eBay

There is currently a Fairthorpe Electron Minor for sale on eBay if anyone is interested in taking a punt on a nice little classic kit car. The ad states it is an Electron but we all know better just from looking at it.

Have a look at the eBay ad here

By the way, to the Anonymous commenter who mentioned a Fairthorpe 'barn find' back in March please get in contact with me for a further chat. I've been compiling a record of surviving cars for the last 30 years and would like to find out which one this is.

Rear axle and brakes


As the car had been standing for over two decades, the brakes were going to need replacement parts but I wasn't sure what condition the axle was in because the casing was very grubby and had a lot of surface rust. The rear axle was stripped of its component parts, all of which were checked for damage or excessive wear, cleaned with degreaser and then reassembled with new gaskets. As it turned out the rear axle casing only needed a good wire-brushing, degreasing and a coat of black Smoothrite.New rear wheel cylinders and brake shoes had to be purchased to replace the old worn ones, but the adjusters only needed cleaning and greasing. Assembling the rear brakes and fitting the drums with their retaining screws completed the work on the back axle and it was then fitted to the recently refurbished trailing arms.

rear axle installed

Attention then turned to the front brakes. The car originally had drum brakes, but it was clear these had been replaced with Triumph Spitfire disc brakes by a previous owner to improve braking performance. Unfortunately they were heavily corroded so a new pair of discs were fitted onto the Spitfire hubs and a new set of bearings fitted and packed with Castrol LM grease (high melting point). The brake calipers were partially seized so these had to be dismantled, cleaned, given a coat of black Smoothrite and fitted with new seals. The old pads were kept as they had very little wear and they were attached into the calipers with their pins and R clips. Finally the calipers were fitted onto the hubs, which were in turn attached onto the uprights and the bearings adjusted as per the Haynes Triumph Spitfire manual instructions.

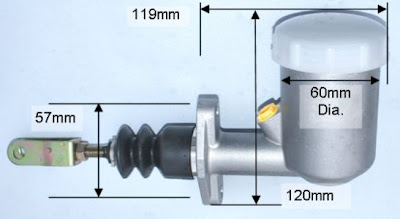
The brake master cylinder was seized and upon stripping was found to have a heavily pitted internal bore so a replacement (0.75 bore) was necessary. The Fairthorpe originally had a master cylinder with a standard-sized reservoir but I decided to fit a larger 60mm diameter reservoir instead because it provides more fluid so there's less chance of the level dropping to critical if a wheel cylinder leaked, a situation that could leave you with no brakes! The new cylinder's operating rod had to be switched with the original Fairthorpe rod to sit the pedals back into the right position - it was far too long and would have positioned the pedals at an impossible angle too close to the driver.


replacement brake master cylinder

The clutch and brake pedal assembly was cleaned using degreaser, painted with black Smoothrite and fresh grease was pumped into the nipples. New pedals were fitted to the pedal assembly, as the rubber on the old ones was perished and worn, but luckily I had a stock of these as they are no longer available. The pedal assembly and master cylinder were then refitted to the chassis and the master cylinder joined to the pedals with a new clevis pin and split pin. New copper brake pipes were run round the chassis to replace the old corroded steel ones while new stainless steel braided flexible pipes replaced the old perished set, and the brass unions cleaned. The brake system was now filled with brake fluid and bled several times to remove any remaining air.
pedal assembly to the right

So now I had a rolling chassis and it was time to fit the floor pans and body shell.

Monday, 8 March 2010

Assembly of the suspension

A lot of the suspension work on 789 ERO had been done when I started the restoration 20 years ago.

Back then the Standard 10 wishbones on the front suspension were stripped and the threaded nuts checked for wear. Some of the worn ones were replaced with better ones sourced from a breaker's yard. The paint was removed from the wishbones and they were repainted with black Smoothrite.

Then I went in for a cup of tea and a Mr Kipling.

Fast forward 20 years and a lot of Mr Kiplings later
, I got back out there and cleaned off the loose and flaking paint and gave the wishbones another coat of Smoothrite (I hasten to add it was a different tin). Trimuph Spitfire uprights were fitted with new top ball joints and the trunnions checked for play (worn trunnions are an MOT failure). To fit the uprights however, they had to be modified.

I had decided to fit disc brakes from Triumph Spitfire instead of Standard Ten drum brakes, but it meant the threaded nuts had to be screwed into the outer end of the wishbones and drilled to take the Triumph Spitfire trunnion bolt. You can use Standard Ten trunnions and screw your uprights into them, but I find for ease of maintenance and reduced wear on the threaded nuts it's better to do it this way.

The trunnions were then filled with EP90 oil. Although some people fill trunnions with grease, I've found this can cause sticking and accelerate their wear and tear. EP90 reduces the risk of this happening. Finally, the stub axle was cleaned, given a coat of black Smoothrite and bolted on.

The front suspension was then bolted to the chassis and I moved on to the rear suspension.

The bushes

The Fairthorpe Electron Minor mk1 rear axle consists of a wishbone and a parallel arm (trailing arms) on either side. At both ends of the parallel arms is a Metalastik® bush, which will invariably need replacing as the rubber splits and perishes and the bolts which hold them in place seize into the bushes.

Before I went for my cup of tea and Mr Kipling 20 years ago I replaced all of the bushes as follows:

1) Those bolts that were seized were cut either side of the bush with a hacksaw. It's a bit of a drawn out job as there's no room to get your hacksaw blade in. Once cut, the trailing arms were removed.

2) The bushes consist of a steel sleeve with rubber inside which houses a steel tube for the bolt to run through. Once the bushes have been in for a few years, it's impossible to just push them out. The easiest way to remove them is to burn the rubber out using a blow torch. Once the rubber is sufficiently weakened, you can knock the centre rubber and steel tube out just leaving the outer casing of the bush.

3) To remove the outer casing of the bush, you need to use a hacksaw blade and carefully cut through the sleeve without damaging the wishbone. Once the cut is made, you can then use a small chisel and knock the sleeve out of the trailing arm.

4) The new bushes can be pushed in using a vice, and it's helpful to put some Copper Ease round the outside to help ease it in.

Doing this job meant that 20 years later all I had to do was inspect the bushes for any splitting or perishing, which thankfully there wasn't as they hadn't been used. The trailing arms were cleaned and painted with black Smoothrite, refitted and the bolts inserted with a coating of Copper Ease to prevent seizing. New Nyloc nuts were then fitted to the bolts.

The shock absorbers

Unfortunately, the shock absobers were totally shot so a large amount of money had to be prized from my fingers for a new set of four Spax shock absobers and springs. Irritatingly, Spax no longer supply springs so I had to source both the springs and shocks through a friend's nephew who regularly has springs made up for his racing cars.

When the springs turned up three or four days after ordering, disappointingly they were too short and had to be sent back. The lovely new shock absobers sat in a box staring at me. More waiting. The next set of springs were thankfully the right size and, once fitted, the shocks were loosely attached to the chassis - the back by just the top bolts as the axle had yet to be fitted, and the front by the top and bottom bolts.

This completed the suspension of 789 ERO. It was then on to the rear axle and brakes.

Friday, 19 February 2010

Refurbishing the chassis

Chassis ready for shotblasting

Once I was satisfied the engine and gearbox fitted ok, the body shell and the running gear were removed to leave a bare chassis. The outriggers and side rails had already been replaced 20 years before, but there were now a couple of areas at the rear of the chassis which had to be cut out and repaired. Two sets of rails were also needed to bolt the seats through, as originally they were only bolted through the fibreglass floorpans with large penny washers to spread the load! Then of course there were the seat belt mounting points to fabricate and weld, which were not present when the car was built.

Once all the welding was complete, it was ready for shotblasting.

I chose not to have the chassis powder-coated at the same time, as it was very expensive and any modifications to the chassis at a later date would require grinding off the (expensive) powder coating and touching up with paint. That would defeat the purpose of having the powder coating in the first place. In addition, the original chassis was silver not black, so I decided to go with a painted silver finish.

The chassis was back within 48 hours and then it was all hands to the pump. It was crucial to get the chassis coated with a rust prevention layer as quickly as possible before the damp started to oxidise the finish. I chose to use a rust prevention system called POR15, which is comprised of two different products:

POR15 Metal Ready, which is a liquid rust converter and etcher
POR15 Silver Rust Prevention Paint

One coat of the Metal Ready was brushed on, left to do its job for a while and then washed off with water.


The shotblasted chassis after washing off the Metal Ready etcher. Note both sides of the chassis now have seat mounting rails welded between the centre and rear outriggers

This produced a slightly alarming sight; rust streaks, but actually this is the way the system is designed to work. The Silver Rust Prevention Paint that follows works better on a slightly rusty surface.

The chassis primed with Silver Rust Prevention Paint. Starting to look a bit sexy now!

Unfortunately though, the prevention paint is not UV-resistant so I had to add a coat of the product Sterling Silver (made by the same manufacturer) to stabilise the finish against sunlight.

The chassis painted with Sterling Silver to make it UV-resistant

So that was the chassis complete. Now I could move on to the suspension and running gear.

Friday, 12 February 2010

The rebuild begins...trial engine fit.

The first part of the rebuild was straightforward: assemble the engine and check that it sat on the engine mounts properly.

The engine minus cylinder head

One should never assume anything is straightforward.

The original engine was a 948cc from a Standard Ten, but this had long since disappeared so I chose to use an engine from a 1300 Triumph Spitfire. Outwardly, it looks very similar to the Standard Ten engine, which is important to me as I want to maintain as much of the original appearance in the engine bay, plus it gives far more performance for modern day motoring.

However, it wasn't going to be a simple job to just drop the engine in. The front plate had the wrong engine mounts, so I had to change the plate for one from a Standard Ten. I had done this swap several times before on an 1147cc Triumph Spitfire engine and there was never a problem. This time was different. Unexpectedly the crankshaft starting fouling on the front plate so I had to grind out the crankshaft hole to make it larger. Also, the engine back plate and gearbox bell housing had to be cut and shaped on either side to clear the chassis rails.

The cylinder head was then removed to check the bores and valves, which were fine, and I took the opportunity to give it a quick decoke to remove the carbon deposits from the pistons and valves. The cylinder head was put back with a new gasket (first picture above), and the head was torqued down to 45lb/ft using the correct sequence for tightening the nuts. I left the valve clearance adjustment until the engine was placed permanently in the car at a later date.

Then I turned my attention to the mounts on the chassis, which I had put in 20 years before with the intention of racing the car with a Ford engine. Now the intention was to keep the car as original as possible and use it only for classic runs and club events, so I fabricated a mounting to take the Triumph engine.


The existing Ford mounts

The new mounts to take the Standard Ten. At this point the old mounts are still in place

I was hoping to keep the old Ford mounts in case I ever wanted to fit a Ford engine in the future, but it became clear that they were going to foul the exhaust and starter motor so disappointingly I had to cut them off.


Test fitting the engine to discover the Ford mounts must be removed. Note my wife's hand guiding the gear box onto its mounts. And she bakes decent cakes too.

The engine was fitted with a new clutch assembly plus new clutch release arm pivot bushes, which had worn badly on one side.

To join the engine and gearbox to the rear axle I turned my attention to the prop shaft. I had two old prop shafts knocking around, one which had the flange to fit the 1300 gearbox and the other which had the flange to fit the Standard Ten axle. These were taken to a prop shaft specialist who checked the universal joints and pronounced them fit for scrap.

So, much to my irritation a new prop shaft had to be fabricated (at great expense!) but they did an excellent job so I don't really begrudge them. Much.

At this point the engine was removed and work began in earnest on the chassis.

Wednesday, 27 January 2010

A brief history of Fairthorpe 789 ERO


What type of Fairthorpe is 789 ERO?
789 ERO is an early 3-seater Fairthorpe Electron Minor mk1 (colour: 'gelcoat' blue with a crimson racing stripe) manufactured in kit form in 1958.

Frank Collins, my father, bought the kit in October 1958 for £425 - around £7,400 in today's money - and it was delivered to his rented lock-up on the 11th October. In those days, buying the car in kit form saved a considerable amount of money in 'purchase tax' - the precursor to VAT - and was an important consideration to cash-strapped car fanatics like Frank.

He spent just one month (yes that's right! 30 days!) building it in a garage with no power or light. He wore out three hand braces just drilling the chassis holes.

It was registered 18th November 1958 with an expertly painted rear registration number in blue and white Dulux! At a later date, a proper metal plate was fitted.
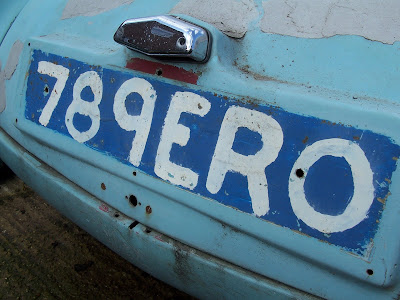


It became his everyday car, getting him to work and back during the week, but it was at the weekends that the car was really put through its paces. As both part of the original Fairthorpe Work's team with John Green and Peter Butt and as as a sole competitor, Frank raced 789 at national racing circuits such as Silverstone, Brands Hatch and Mallory Park. He competed and won against some of the best drivers in his class including Fairthorpe Car's Founder Air Vice Marshall Don Bennett (of wartime Pathfinder fame).

Fairthorpes do enjoy La Dolce Vita
In 1959, 789 proved its stuff once more by taking Frank and his new bride Audrey to Italy on their honeymoon, driving across France, through the alps and down to the east coast of Italy to Diano Marina. Despite the rarity of the cars, it was shock for Frank and Audrey to see another Fairthorpe coming in the opposite direction while driving along one day and they grabbed the chance for a photo op and a natter.

When I came along in 1961, I was promptly parked into the little middle seat (note the lack of seatbelts!!). In fact when I wouldn't sleep at night and was making a hell of a racket, Frank would put me into the car and thrash up the A41 until I fell asleep.

But when baby number 2 appeared - my brother Graham - in March 1963 it was clear that the car was no longer practical for a growing family and was sold in July 1964. That was the last we would see of 789 for 23 years.

A chance discovery
In 1987, I was rebuilding classic sportscars, including Fairthorpes, in partnership with my father down in Denham. Then by chance one day, while at a kit car show in Bingley Hall Staffordshire, a chap came up to us on the stand and looked over a restored Fairthorpe we had just completed. He mentioned that he had one of them in his garage. I used to keep a record of surviving Fairthorpe registration numbers and asked him what his was so I could update my records. He couldn't remember the letters, but could remember the numbers; 789. I was shocked and surprised. "It's not 789 ERO is it?" I asked. It was his turn to look shocked. "How did you know that?"

Straight away I asked him if would sell it to me, but he refused. He had bought the car as a retirement project for his father so I took his phone number then every few months rang and pestered him. Finally, nearly 18 months later, he gave in and offered to sell the car to me WITHOUT the registration number. He'd had it valued at £750 and was hoping to get more money. No deal. I wanted the car AND the registration number. And for a hell of a lot less than he was asking.

It was a further six months before I persuaded him to sell the car and the registration plate together for a reasonable price.

The return of 789
So on 27th May 1989, Frank and I drove to Liverpool on a Bank Holiday Saturday during some of the worst traffic we'd ever had the misfortune to be stuck in. We were amazed to find that the period modifications that Frank had made were still on the car, including two household rubber doorsteps that were fitted to the back of the bonnet to increase the throughflow of air round the engine when racing. It had also acquired a name: Little Nero.


Little Nero had been repainted Triumph Apple Green and, through a quirk of fate, the previous owner had masked up the metal number plate rather than remove it for respraying, thereby preserving the original Dulux number. On the bonnet was a large black panel with the contact details of a car accessory shop, which we later found out was painted on by the owner of the shop as advertising when he raced and auto-tested the car.

The wrecking crew get to work
I began the restoration almost immediately, cutting out the rotten outriggers and side rails of the chassis and rebushing the rear suspension. The car had been modified at the front and the original Standard 10 front suspension had been removed and replaced with that from a later Triumph Spitfire. This was cut off and an original Fairthorpe/Standard 10 set up refitted. I added a set of Ford engine mounts so I could race it with a Ford engine.

Then life intervened. Work changes. House moves. Marriage. Little Nero stood outside and deteriorated under a sheet. It was a further 20 years before I went back to complete what I had started.