
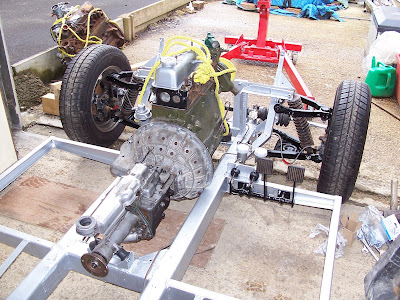
rear axle installed
Attention then turned to the front brakes. The car originally had drum brakes, but it was clear these had been replaced with Triumph Spitfire disc brakes by a previous owner to improve braking performance. Unfortunately they were heavily corroded so a new pair of discs were fitted onto the Spitfire hubs and a new set of bearings fitted and packed with Castrol LM grease (high melting point). The brake calipers were partially seized so these had to be dismantled, cleaned, given a coat of black Smoothrite and fitted with new seals. The old pads were kept as they had very little wear and they were attached into the calipers with their pins and R clips. Finally the calipers were fitted onto the hubs, which were in turn attached onto the uprights and the bearings adjusted as per the Haynes Triumph Spitfire manual instructions.
The brake master cylinder was seized and upon stripping was found to have a heavily pitted internal bore so a replacement (0.75 bore) was necessary. The Fairthorpe originally had a master cylinder with a standard-sized reservoir but I decided to fit a larger 60mm diameter reservoir instead because it provides more fluid so there's less chance of the level dropping to critical if a wheel cylinder leaked, a situation that could leave you with no brakes! The new cylinder's operating rod had to be switched with the original Fairthorpe rod to sit the pedals back into the right position - it was far too long and would have positioned the pedals at an impossible angle too close to the driver.
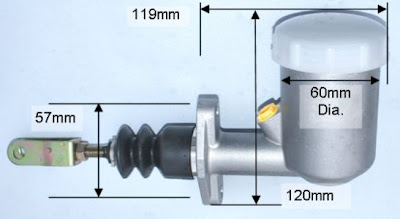
replacement brake master cylinder
The clutch and brake pedal assembly was cleaned using degreaser, painted with black Smoothrite and fresh grease was pumped into the nipples. New pedals were fitted to the pedal assembly, as the rubber on the old ones was perished and worn, but luckily I had a stock of these as they are no longer available. The pedal assembly and master cylinder were then refitted to the chassis and the master cylinder joined to the pedals with a new clevis pin and split pin. New copper brake pipes were run round the chassis to replace the old corroded steel ones while new stainless steel braided flexible pipes replaced the old perished set, and the brass unions cleaned. The brake system was now filled with brake fluid and bled several times to remove any remaining air.
pedal assembly to the right
So now I had a rolling chassis and it was time to fit the floor pans and body shell.


No comments:
Post a Comment