 Chassis ready for shotblasting
Once I was satisfied the engine and gearbox fitted ok, the body shell and the running gear were removed to leave a bare chassis. The outriggers and side rails had already been replaced 20 years before, but there were now a couple of areas at the rear of the chassis which had to be cut out and repaired. Two sets of rails were also needed to bolt the seats through, as originally they were only bolted through the fibreglass floorpans with large penny washers to spread the load! Then of course there were the seat belt mounting points to fabricate and weld, which were not present when the car was built.
Once all the welding was complete, it was ready for shotblasting.
I chose not to have the chassis powder-coated at the same time, as it was very expensive and any modifications to the chassis at a later date would require grinding off the (expensive) powder coating and touching up with paint. That would defeat the purpose of having the powder coating in the first place. In addition, the original chassis was silver not black, so I decided to go with a painted silver finish.
The chassis was back within 48 hours and then it was all hands to the pump. It was crucial to get the chassis coated with a rust prevention layer as quickly as possible before the damp started to oxidise the finish. I chose to use a rust prevention system called POR15, which is comprised of two different products:
POR15 Metal Ready, which is a liquid rust converter and etcher
POR15 Silver Rust Prevention Paint
One coat of the Metal Ready was brushed on, left to do its job for a while and then washed off with water.
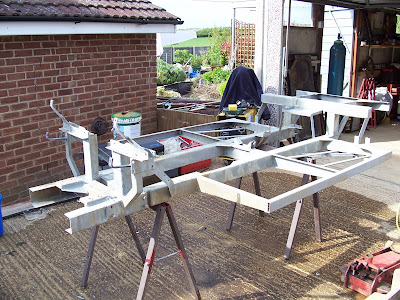 The shotblasted chassis after washing off the Metal Ready etcher. Note both sides of the chassis now have seat mounting rails welded between the centre and rear outriggers
This produced a slightly alarming sight; rust streaks, but actually this is the way the system is designed to work. The Silver Rust Prevention Paint that follows works better on a slightly rusty surface.
 The chassis primed with Silver Rust Prevention Paint. Starting to look a bit sexy now!
Unfortunately though, the prevention paint is not UV-resistant so I had to add a coat of the product Sterling Silver (made by the same manufacturer) to stabilise the finish against sunlight.
 The chassis painted with Sterling Silver to make it UV-resistant
So that was the chassis complete. Now I could move on to the suspension and running gear.


Great Blog Martin.....but I'm now a bit worried by your reference to the seats being fitted via the glass fibre body shell with "large washers to spread the load!"......as I still have the original Fairthorpe seat fitting "spec." on my Electron!!
ReplyDeleteHave you looked to see what's on the underside of the seat bolts? If it's just large penny washers or small plates, it ideally wants some metal strips welding in between the centre and rear outriggers. Tricky job with the body on as fibreglass burns easily!
ReplyDelete